Friday, August 28, 2015

Cupcake

Hello nail art fans!!

This week's manicure was inspired by a special upcoming event; I'm having a birthday this weekend! I automatically knew what design I wanted to try out. It took me a while to figure out what colors to use, since I didn't have a white nail polish which is the traditional color used in this manicure, but it all worked out. For this manicure you will need three colors of nail polish, dotting tools, striping tape and patience.

I started out with a base coat of OPI Nail Envy. On my ring fingers and thumbs, I placed a piece of striping tape horizontally about a third of the way down. I then painted below the striping tape with Sei Bella Coral Fantasy. I then removed the striping tape. Once that was completely dry, I placed about seven pieces of striping tape vertically on the part that I just painted. I then painted on top of that same coral area with Julep Sienna. I then carefully removed the pieces of tape. I then used a large dotting tool and Julep Teri to make a cloud shape above the stripes I just made, so that it looks like frosting on a cupcake. Once that was completely dry, I used a small dotting tool and the colors Julep Sienna to make the sprinkles on the frosting and Sei Bella Coral Fantasy to make the cherry on top of the cupcake.

I then painted my pointer, middle and pinky fingers in two coats of Sei Bella Coral Fantasy. On my pointer and pinky fingers I used a small dotting tool and Julep Sienna to place three dots at the base of the nail above the cuticle. The middle dot is slightly larger than the outer two dots. On the middle finger, I used a medium sized dotting tool and Julep Sienna to create a dotted heart shape on the nail. Once all was completely dry, I finished my manicure with a fast drying top coat of INM Out the Door.

Striping tape horizontally across the nail 

Sei Bella Coral Fantasy below tape 

Tape Removed 

Striping tape vertically on coral color 

Julep Sienna over striping tape coral area 

Tape removed 

Julep Teri cloud above stripes to resemble frosting

Sei Bella Coral Fantasy for cherry on top and Julep Sienna sprinkles
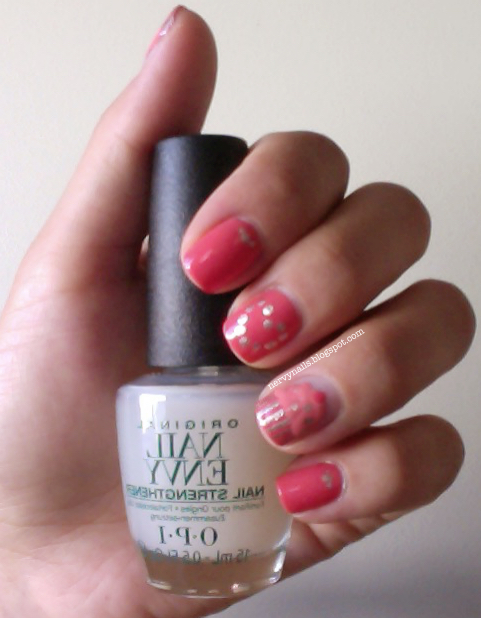


Finished!

Okay, so this is a very elaborate manicure. I couldn't imagine doing a cupcake on every nail, it would be so time consuming! I really liked how this turned out though. If I would have had a striper nail polish, I would have totally used it to make the stripes instead of using my tape. That would save you LOTS of time. Still though, it was fun to do. I'm excited to try out more things. Hope you enjoyed this look and I will see you next time!!


Thursday, August 20, 2015

Sealed envelope

Hey!

This week's manicure was made up entirely on the spot. I started with one idea and ended up with this. For this look you will need three colors of nail polish, striping tape and a dotting tool.

I started with a base coat of OPI Nail Envy. I then did two coats of Sei Bella Stardust. Once that was completely dry, I placed two pieces of striping tape over the nail so that it forms an X right in the center. I then used Sei Bella Robin's Egg Blue and painted the left and right sides of the X and then carefully removed the striping tape. Once that was dry, I used a medium sized dotting tool and Icing Heavy Metal and placed a dot in the very center of the X. After that was dry, I finished my manicure with a fast drying top coat of INM Out the Door.

Sei Bella Stardust


Striping Tape in an X

Sei Bella Robin's Egg Blue on left and right sides of X

Striping Tape removed


Finished!

What do you think? Different huh?! This look is very bold and busy. You could make it even more busy by painting each section a different color or alternate the colors every other nail. I hope you enjoyed this look and I will see you next time!


Thursday, August 13, 2015

Ribbon

Hey!

I am so excited to share with you this simple yet beautiful manicure! It amazes me how many different designs I can come up with by using the exact same tools. For this look you will need two colors of nail polish and striping tape.

I started with a base coat of OPI Nail Envy. I then did two coats of Julep Sienna. Once that was completely dry, I placed two pieces of striping tape at the base of the nail, starting at the middle and going diagonally to the left, so that the two pieces of tape are parallel to each other. I then used another two pieces of tape and did the exact same thing but placed them so that they made a mirror image on the right side. I then used Julep Bette to paint over the entire nail with the striping tape in place. I then carefully removed the striping tape. Once that was completely dry, I finished my manicure with a fast drying top coat of INM Out the Door.


Julep Sienna 


Striping Tape 


Finished!

Isn't that gorgeous?! I absolutely loved how this turned out! Amazing what a difference a few simple lines can make! I think what makes this look so cool is the fact that I used a glitter polish as the base, it makes it stand out that much more. I hope you enjoyed this look and I will see you next time!


Thursday, August 6, 2015

Tent

Hey!

This week I decided to use my striping tape. I immediately remembered a manicure I had seen on Pinterest and I came up with the following look. For this manicure you will need two colors of nail polish and some striping tape.

I started off with a base coat of OPI Nail Envy. I then did two coats of Icing Heavy Metal. Once that was dry, I placed three pieces of striping tape, one going vertically down the middle of the nail and the other two coming down diagonally on the left and right side from where I had placed the first piece of tape so that it looks like a tent. I then used Sei Bella Violet Storm to paint over the entire nail while the tape was in place and then carefully removed the tape immediately afterwards. Once that was completely dry, I finished my manicure with a fast drying top coat of INM Out the Door.


Icing Heavy Metal 


Striping tape 

Sei Bella Violet Storm over striping tape

Striping Tape removed


Finished!

Pretty cool, huh?! I love the contrast of the two colors and how bold it looks! Pretty simple if you are careful about removing the tape. If it helps, try using a tweezer to remove the tape instead of using your fingers. Other than that, as always, make sure you are completely dry before going in with a top coat. I hope you enjoyed this manicure and I will see you next time!