Thursday, April 30, 2015

Pyramid

Hello!

This week I wanted to do something with the color pink and I suddenly realized that I was very limited in my collection when it came to that color. Since I wanted to use striping tape for this design, I didn't want to use the pink I had, because it's a metallic and they are a pain to work with as a base color when using striping tape, SO, I used a coral color instead. For this look, you will need two colors of nail polish and of course, striping tape.

I started with a base coat of OPI start to finish formaldehyde free formula. I then did two coats of Sei Bella Coral Fantasy. Once that was dry, I used two pieces of striping tape to form an X on the center of the nail. I then painted below the area where the center of X begins, going down towards the tip of the nail, in Julep Sienna and quickly removed the tape. Once everything was completely dry, I sealed my manicure with a fast drying top coat of INM Out the Door.


Sei Bella Coral Fantasy 


Striping Tape in an X 


Julep Sienna below striping tape


Finished!

This was pretty simple. The gold color really stands out next to the coral making the "pyramid" almost pop out. I thought about adding some dots alongside the pyramid but I wanted to keep it plain. You could even do another layer of color on top of the gold, following the same pattern that was used to create the gold pyramid. I hope you enjoyed this look and I will see you next time!


Thursday, April 23, 2015

Negative Space

Hello!

This week's manicure was inspired by a trend called "negative space". Basically the look incorporates showing your natural nail and pairing it with a bold color. There are so many kinds of "negative space manicures" but this is what I came up with. For this look you will need two colors of nail polish, striping tape and a small dotting tool.

I started off with a base coat of OPI start to finish formaldehyde free formula. I then placed a piece of striping tape horizontally on the nail about a third of the way down. I then painted above the tape with Nicole by OPI I Lilac Gumdrops and then removed the tape. I did a total of three coats of the I Lilac Gumdrops. Once dry I used a small dotting tool and Sei Bella Violet Storm to place a horizontal line of dots just below where I had placed the striping tape, so that it divides the purple color from my natural nail color. Since I used a textured nail polish for this manicure there was no need for a top coat.


OPI Start to Finish Base Coat

Striping Tape 

Nicole by OPI I Lilac Gumdrops above striping tape

Three coats of Nicole by OPI I Lilac Gumdrops

Finished!

If you don't have striping tape, you could probably get away with not using any to do this look since the line will be covered up by the tiny dots placed above it. If I hadn't used a textured polish, I would have finished this with a top coat. This was pretty simple to do and it's a very fun, edgy look. Hope you enjoyed it and I will see you next time!


Thursday, April 16, 2015

Chevron

Hey!

This week I went out with my family to the Natural History Museum of Utah. While we were there I noticed someone's nail polish, which happened to be a bright neon green. I automatically thought of a nail polish color I had in my stash that I hadn't used in a while and I knew what I was going to do for my upcoming manicure. For this mani you will need two colors of nail polish and plenty of striping tape.

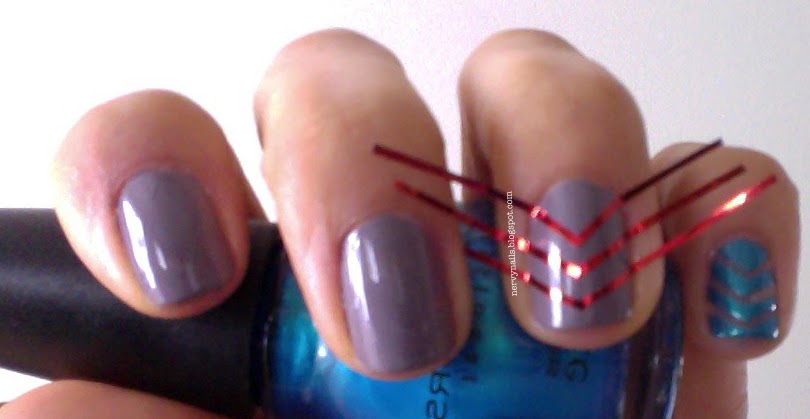
I started out with a base coat of OPI start to finish formaldehyde free formula. I then did two coats of Sei Bella Purple Taupe. Once that was dry, I used six pieces of striping tape and taking two at a time, placed them in a V shape at the center of the nail, three times. I then painted over the entire nail using Sinful Colors Love Nails and immediately removed the tape. Once completely dry, I sealed the manicure with a fast drying top coat of OPI start to finish formaldehyde free formula.


Sei Bella Purple Taupe

Striping Tape V shape 3 times

Sinful Colors Love Nails over striping tape


Finished!

Don't know if you noticed, but on my pinky, ring and index finger I had some of the grey base color lift up. To avoid that, use a tweezer to remove the tape from the middle instead of from the outside. I don't know if it's because I didn't wait long enough, but not every nail gave me that problem, so I don't know.. either way, it made me realize that it would look cool if I would have not used a base color and just left it clear. I really like the textured look that the lines give off. This photo doesn't show how bright this blue nail polish is, it is a super fun color. I hope you enjoyed this look and I will see you next time!


Thursday, April 9, 2015

Pinstriped

Hey there!

This week I had a nail break and it made me change my nail shape. I've been shaping my nails in a square-ish shape and now they are round. I can't decide if I like this shape better, since it is more natural looking, but I guess when my nails grow out a little more I'll know for sure. That's the fun thing about doing your own nails, you can change them up whenever you feel like! I also ran out of my top coat and had to use my base coat/strengthener as the top coat as well, which is okay since it says top coat on the bottle too, so we'll see how it holds up. The manicure I did this week is pretty simple and all you need is two colors of nail polish and lots of striping tape.

I started off with a base coat of OPI start to finish formaldehyde free formula. I then did two coats of Sei Bella Coral Fantasy. Once dry, I placed pieces of striping tape vertically on the nail about 6-8 pieces, depending on how you space them, though I did put them pretty close together. Then I painted over the entire nail with Julep Sienna and carefully removed the striping tape. Once completely dry, I sealed it with a top coat of OPI start to finish formaldehyde free formula.


Sei Bella Coral Fantasy 

Striping tape 

Julep Sienna over tape 

Remove tape

Finished!

Since I've use striping tape plenty of times before, I always make sure that if I'm going to use a metallic color, that I use that color to go over the tape and use a matte color as the base because it will dry and stay put much faster and not lift up when it's time to remove the tape. Even so, I did have some polish lift up a little and I noticed that if I removed the tape starting at the tip of the nail and going down towards the cuticle that it doesn't lift up the polish compared to when I lift up the tape starting at the cuticle. Hope that makes sense. Anyway, pretty cool looking and pretty easy. Hope you enjoyed this look and I will see you next time!

Thursday, April 2, 2015

Diagonal Flowers

Hey there!

This week's manicure is very subtle and simple. I wanted to use a neutral color and then I decided I  wanted to add flowers. For this look, you will need dotting tools, foil to pour nail polish onto to dip your dotting tools, and three colors of nail polish.

I started with a base coat of OPI start to finish formaldehyde free formula. I then followed with two coats of Sei Bella Vintage Mauve. Once dry, I used a dotting tool (small sized for my pinky fingers, medium sized for all the rest and a little bigger sized for my thumbs) and in the upper left corner of the nail, I placed five dots in a circle, so that it leaves a space in the middle and it looks like a flower. I did the first flower in Sei Bella Coral Fantasy. I then did the second flower in Sei Bella Pink Sherbet and placed it in the center of the nail. I then did the third flower again in Sei Bella Coral Fantasy and placed it in the bottom right corner of the nail. I alternated the color pattern on every other nail. On one nail it was, coral, pink, coral and on the other it was, pink, coral, pink. Once completely dry, I sealed it with a fast drying top coat of INM Out the Door.

Sei Bella Vintage Mauve

Flowers in Sei Bella Coral Fantasy and Sei Bella Pink Sherbet

Finished!

I wish my camera took better quality photos, you can barely see the pink flowers! If you look at the second photo a little closer, you can see the detail of the flower. Before I made the flowers on my nails, I practiced on the foil and that helped. It's not too bad. I like how it turned out. It's simple and cute. Hope you enjoyed this look and I will see you next time!