Thursday, November 27, 2014

Tribal (Leaf)

Happy Thanksgiving!!

Can you believe it? The year is almost gone!! I am SO excited to share with you this mani. I wanted to do something tribal looking, since it is Thanksgiving. Lots of tribal prints out there require a nail striper, which I don't have. So when I found this pattern I was stoked.  Well, here we go!

I started off with a base coat of OPI Start to Finish Formaldehyde Free Formula. I followed with two coats of OPI Alpine Snow. Once completely dry, I put a piece of nail striping tape down the middle of the nail. I then put four more pieces of tape, taking two at a time, forming a V at the center of the first piece of tape in the middle and another just below it. I then painted the middle "V" section in ORLY Liquid Vinyl. The left side of the nail was painted in ORLY Buried Treasure and the right side was Sei Bella Vintage Teal. The base of the nail was also painted in ORLY Liquid Vinyl. I then removed the tape and once completely dry, sealed it off with INM Out the Door fast drying top coat.
OPI Alpine Snow
Nail striping tape placement


Painted sections of ORLY Liquid Vinyl, ORLY Buried Treasure and Sei Bella Vintage Teal

Nail striping tape removed


Finished!


Depending on how you space the tape, the look of this mani can differ. Painting the sections was a little more difficult since I chose more than one color. I had to paint kind of side ways and in really short strokes, kind of patting it at times. You could make it easier for yourself and just do one color over the entire nail and then remove the tape or just do two, one color on each side.  The black part at the base of the nail was supposed to look like the V pattern of the white lines, but I did that free hand, so that's why it came out a little sloppy. If I had a nail striper, it would have been easier and much neater looking. Anyway, I totally LOVE this mani. Hope you do too! See you next time!

Thursday, November 20, 2014

Ruffian (Reverse Half Moon)

Hello!

This past week I finally was able to add a silver polish to my collection! Lucky for me, every so often I get to use my loyalty shopping points with Melaleuca and I use it every time on a nail polish, so it was free! Yeah!! So once it came, I started thinking about what mani I was going to do.

I am so into doing nail art now, that I am not afraid to try a design, even if when looking at a picture online, I don't immediately fall in love. That was the case with this manicure called "the ruffian". I had seen pictures before and I didn't think much of it. This was my first attempt and I have to say that I really do like it. You don't need any tools, just nail polish and once you are comfortable with painting your nails, it is a very simple design to achieve.

I started off with a base coat of OPI Start to Finish Formaldehyde Free Formula. I then followed with two coats of Sei Bella Stardust. Once that was dry, I went in with Orly Liquid Vinyl, starting just a little below where I had done my previous color and basically painting the nail again, only being careful not to completely cover the sides, leaving a U shaped line of silver, surrounding the black polish, when complete. This can be accomplished in three simple strokes, first one going down the middle and the other two to the left and right of that first line, just like painting your nails one solid color. Then once that was completely dry, I sealed it off with a fast drying top coat of INM Out the Door.

Sei Bella Stardust


Orly Liquid Vinyl on top 


Finished!

It might be a little difficult for you to achieve this look if you are not already comfortable with painting your nails. You could use a reinforcement sticker cut in half as a guide and place it at the base of your nail and then paint the rest of your nail another color and achieve the same look. Really though, with practice of the basic three stroke application of polish, you can easily achieve this look very quickly. So in my book, this is a simple, eye catching mani. Hope you enjoyed it! See you next time!

Thursday, November 13, 2014

Stripe Accent

Hello and happy Thursday to you!

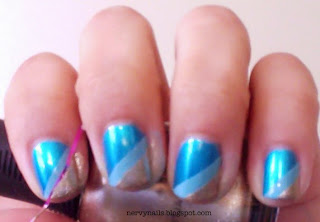
This past weekend, I hosted a baby shower for one of my best friends. She was super sweet and gave me a nail polish as a thank you gift. I was super excited to use it in this manicure. It's one of those colors that look great on its own. I was so tempted to just leave it alone and not do a design. When I was done, I realized that it could be labeled as a "Frozen"themed design. The color combination remind me of Queen Elsa. Totally not done on purpose, but hey, it's cool. So here's how I did it.

I started with a base coat of OPI Start to Finish Formaldehyde Free Formula. I then followed with 2 coats of Sinful Colors Love Nails. Once that was dry, I placed a piece of striping tape diagonally across the center of the nail (on my right hand the tape faced left and on my left hand, it faced right) I then painted the space above the tape with Wet n Wild Megalast I Need a Refresh-Mint and removed the tape right after. Once that color was dry, I placed another piece of striping tape just above where I had made the previous line and painted above the tape with Orly Luxe. I then removed the tape and allowed it to completely dry, before sealing it up with a fast drying top coat of INM Out the Door.


Sinful Colors Love Nails


Striping tape Part 1
Wet N Wild Megalast I Need A Refresh-Mint above tape

Striping tape Part 2 
Orly Luxe above tape

Finished!


So what do you think? I'll admit, the color combination is really bold. If I would of had another lighter blue, I would have chosen that color as my last color instead of the gold. Still, it's pretty. Again, if I was dressed up as Queen Elsa, I would feel like it was a perfect fit. Ha ha. Well, see you next time! 


Thursday, November 6, 2014

Two toned polka dots

Hello!!

This week's manicure is the classic look of polka dots! I had fun with this mani by making it two toned. What I love most about this look, is that it will make others think you have stickers on your nails. Anyway, let's get into the details of how I achieved this look.

I started off with a base coat of OPI Start to Finish Formaldehyde Free Formula. I then followed with two coats of Sei Bella Purple Taupe on my pinky, middle and thumb nails and OPI Alpine Snow on my pointer and ring nails.  Once my nails were completely dry, using a small dotting tool, I made a dotted vertical line, starting at the base of my nail (in the middle of my nail) and going all the way up to my tip. Depending on how big your dots are, it should be about 3 or 4 dots. I placed white dots on my taupe nails and taupe dots on my white nails.

I continued to make dotted vertical lines, two more to the right of the first line and two more to the left of it. It should be about five lines all together, though it could be more, depending on the size of your dots and the spacing of them. When starting the second vertical line, be sure to place the first dot above the dot where the previous vertical line began. I failed to take a picture of the placing of the dots, so I took a close up to show the detail of the placement. Hopefully you can see what I mean. Once all my dots where in place and completely dry, I finished with a fast drying top coat of INM Out the Door.

OPI Alpine Snow & Sei Bella Purple Taupe

Dot placement detail 

Finished!

Isn't this so cute?! I just absolutely love how girly these polka dots make me feel. I also loved this color combination. Well, that's all for this week. Until next time :)