Thursday, December 25, 2014

Christmas Glitter

Merry Christmas!!!

This week's mani is SUPER easy!! No tools required, just two kinds of nail polish. This look was perfect for the Christmas holiday and the fact that it was so simple was even better!

I started off with a base coat of OPI Start to Finish Formaldehyde Free formula. I then followed with two coats of OPI Alpine Snow. Then I did one coat of Chirality Blixem on top. Once dry, I sealed it off with a fast drying top coat of INM Out the Door.


So easy right?! It is such a simple way to add a little something more to a manicure. The placing of the larger pieces of glitter can be done by patting the brush on the nail. Since it's clear, it won't look bad anyway, so just be careful not to lay it on too thick. I hope you are having a fabulous holiday season! See you next time!! 

Thursday, December 18, 2014

Gift Wrap

Hey there!!

As always, I am super excited to share with you another great nail art tutorial! This week I was inspired by my son's birthday and the Christmas season. I wanted to create a nail look that reminded me of gift wrap. Working with the nail colors that I chose was a little difficult since I was a metallic nail polish as the base color, but it worked out in the end. Well, let's get into it!

I started with a base coat of OPI Start to Finish Formaldehyde Free formula. I then did two coats of Julep Savoy. Once it was SUPER dry, I used nail striping tape to form a three lined pattern, two going horizontally, starting just under the tip of the nail, one piece of tape under the other and then the third piece of tape going through the other two pieces vertically being placed on either the far left or far right side of the nail, depending on which hand I was painting. On my left hand the third piece of tape was placed on the far right side and on my right hand it was placed on the far left. I then painted over the tape with Julep Bette and removed the tape right after painting. Once completely dry, I sealed it off with INM Out the Door fast drying top coat.


Julep Savoy

Striping tape over Julep Savoy

Julep Bette over striping tape

Remove tape and voila!


Finished!


The hardest part about this manicure was knowing when the base color was dry enough so that when I put the tape on top and remove it, it wouldn't lift it up. If I would have used a regular matte polish I could have done it faster, but since it was a metallic and that formula takes longer for it to be solid dry and not budge, it took a little more time. So that's my biggest piece of advice if you are going to use a metallic color like I did for the base, but really you can use whatever color you like. Other than that I thought this was a pretty easy mani. I loved the end result :) See you next time!


Thursday, December 11, 2014

Snow

Happy Thursday everyone!!

Don't know about you, but the holiday season gets me in the mood for snow. Around here the weather has been really nice and it hasn't snowed much at all. So when I saw a blue polish in the stash that my friend sent me last week, I knew I had to try a "snow" look. Now please forgive me, I was naughty this time and I did not document with step by step photos, so I will do my very best describing the process of this mani.

I started off as always with a base coat of OPI Start to Finish Formaldehyde Free formula. I then did two coats of Julep Margaret. Once completely dry, I used a small dotting tool and OPI Alpine Snow and covered the tip of the nail in small dots, on top of each other, so as to make a french tip. I then proceeded to make more dots going towards the base of the nail and spacing them out further apart and putting less of them as I got to the base. So basically the closer you get to the tip of the nail, the more dots you'll have and the closer together they will be. The farther away you go from the tip, the fewer amount of dots and the further away the dots will be spaced. Once completely dry, I sealed it off with a fast drying top coat of INM Out the Door.


Finished!


The dots dry pretty fast, but I would still wait a good 10-15 minutes before doing the top coat. This look was really fun. Hope you enjoy! See you next time! :)

Thursday, December 4, 2014

Clouds (Staircases)

Hello to you on this lovely Thursday!

This past week, a friend of mine decided to give me a TON of nail polish that she no longer had use for. I was so excited to have some new colors!! So of course I used one of those colors in the manicure I am sharing with you today. If you are all about easy and simple nail art, this one is for YOU!

I started off with a base coat of OPI Start to Finish Formaldehyde Free Formula. I then did one coat of Julep Charlotte. Once dry, starting at just below the base of the nail, on the far right side, I made one vertical line. I then made another line right next to it, starting just below where I had made the previous line and finished with the third line just below that in Orly Liquid Vinyl. Once dry I sealed it with a fast drying top coat of INM Out the Door.


Julep Charlotte

One line of Orly Liquid Vinyl 


Second line of Orly Liquid Vinyl 
Third line of Orly Liquid Vinyl


Finished!

I was surprised how much I loved this really simple look. You could do another row of clouds on top of the first one in another color on just one nail as an accent or on all of them. Well, hope you enjoyed this mani and I will see you next time! 

Thursday, November 27, 2014

Tribal (Leaf)

Happy Thanksgiving!!

Can you believe it? The year is almost gone!! I am SO excited to share with you this mani. I wanted to do something tribal looking, since it is Thanksgiving. Lots of tribal prints out there require a nail striper, which I don't have. So when I found this pattern I was stoked.  Well, here we go!

I started off with a base coat of OPI Start to Finish Formaldehyde Free Formula. I followed with two coats of OPI Alpine Snow. Once completely dry, I put a piece of nail striping tape down the middle of the nail. I then put four more pieces of tape, taking two at a time, forming a V at the center of the first piece of tape in the middle and another just below it. I then painted the middle "V" section in ORLY Liquid Vinyl. The left side of the nail was painted in ORLY Buried Treasure and the right side was Sei Bella Vintage Teal. The base of the nail was also painted in ORLY Liquid Vinyl. I then removed the tape and once completely dry, sealed it off with INM Out the Door fast drying top coat.
OPI Alpine Snow
Nail striping tape placement


Painted sections of ORLY Liquid Vinyl, ORLY Buried Treasure and Sei Bella Vintage Teal

Nail striping tape removed


Finished!


Depending on how you space the tape, the look of this mani can differ. Painting the sections was a little more difficult since I chose more than one color. I had to paint kind of side ways and in really short strokes, kind of patting it at times. You could make it easier for yourself and just do one color over the entire nail and then remove the tape or just do two, one color on each side.  The black part at the base of the nail was supposed to look like the V pattern of the white lines, but I did that free hand, so that's why it came out a little sloppy. If I had a nail striper, it would have been easier and much neater looking. Anyway, I totally LOVE this mani. Hope you do too! See you next time!

Thursday, November 20, 2014

Ruffian (Reverse Half Moon)

Hello!

This past week I finally was able to add a silver polish to my collection! Lucky for me, every so often I get to use my loyalty shopping points with Melaleuca and I use it every time on a nail polish, so it was free! Yeah!! So once it came, I started thinking about what mani I was going to do.

I am so into doing nail art now, that I am not afraid to try a design, even if when looking at a picture online, I don't immediately fall in love. That was the case with this manicure called "the ruffian". I had seen pictures before and I didn't think much of it. This was my first attempt and I have to say that I really do like it. You don't need any tools, just nail polish and once you are comfortable with painting your nails, it is a very simple design to achieve.

I started off with a base coat of OPI Start to Finish Formaldehyde Free Formula. I then followed with two coats of Sei Bella Stardust. Once that was dry, I went in with Orly Liquid Vinyl, starting just a little below where I had done my previous color and basically painting the nail again, only being careful not to completely cover the sides, leaving a U shaped line of silver, surrounding the black polish, when complete. This can be accomplished in three simple strokes, first one going down the middle and the other two to the left and right of that first line, just like painting your nails one solid color. Then once that was completely dry, I sealed it off with a fast drying top coat of INM Out the Door.

Sei Bella Stardust


Orly Liquid Vinyl on top 


Finished!

It might be a little difficult for you to achieve this look if you are not already comfortable with painting your nails. You could use a reinforcement sticker cut in half as a guide and place it at the base of your nail and then paint the rest of your nail another color and achieve the same look. Really though, with practice of the basic three stroke application of polish, you can easily achieve this look very quickly. So in my book, this is a simple, eye catching mani. Hope you enjoyed it! See you next time!

Thursday, November 13, 2014

Stripe Accent

Hello and happy Thursday to you!

This past weekend, I hosted a baby shower for one of my best friends. She was super sweet and gave me a nail polish as a thank you gift. I was super excited to use it in this manicure. It's one of those colors that look great on its own. I was so tempted to just leave it alone and not do a design. When I was done, I realized that it could be labeled as a "Frozen"themed design. The color combination remind me of Queen Elsa. Totally not done on purpose, but hey, it's cool. So here's how I did it.

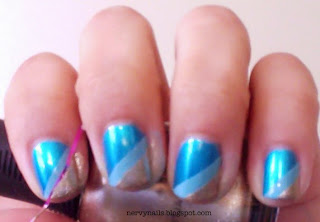
I started with a base coat of OPI Start to Finish Formaldehyde Free Formula. I then followed with 2 coats of Sinful Colors Love Nails. Once that was dry, I placed a piece of striping tape diagonally across the center of the nail (on my right hand the tape faced left and on my left hand, it faced right) I then painted the space above the tape with Wet n Wild Megalast I Need a Refresh-Mint and removed the tape right after. Once that color was dry, I placed another piece of striping tape just above where I had made the previous line and painted above the tape with Orly Luxe. I then removed the tape and allowed it to completely dry, before sealing it up with a fast drying top coat of INM Out the Door.


Sinful Colors Love Nails


Striping tape Part 1
Wet N Wild Megalast I Need A Refresh-Mint above tape

Striping tape Part 2 
Orly Luxe above tape

Finished!


So what do you think? I'll admit, the color combination is really bold. If I would of had another lighter blue, I would have chosen that color as my last color instead of the gold. Still, it's pretty. Again, if I was dressed up as Queen Elsa, I would feel like it was a perfect fit. Ha ha. Well, see you next time! 


Thursday, November 6, 2014

Two toned polka dots

Hello!!

This week's manicure is the classic look of polka dots! I had fun with this mani by making it two toned. What I love most about this look, is that it will make others think you have stickers on your nails. Anyway, let's get into the details of how I achieved this look.

I started off with a base coat of OPI Start to Finish Formaldehyde Free Formula. I then followed with two coats of Sei Bella Purple Taupe on my pinky, middle and thumb nails and OPI Alpine Snow on my pointer and ring nails.  Once my nails were completely dry, using a small dotting tool, I made a dotted vertical line, starting at the base of my nail (in the middle of my nail) and going all the way up to my tip. Depending on how big your dots are, it should be about 3 or 4 dots. I placed white dots on my taupe nails and taupe dots on my white nails.

I continued to make dotted vertical lines, two more to the right of the first line and two more to the left of it. It should be about five lines all together, though it could be more, depending on the size of your dots and the spacing of them. When starting the second vertical line, be sure to place the first dot above the dot where the previous vertical line began. I failed to take a picture of the placing of the dots, so I took a close up to show the detail of the placement. Hopefully you can see what I mean. Once all my dots where in place and completely dry, I finished with a fast drying top coat of INM Out the Door.

OPI Alpine Snow & Sei Bella Purple Taupe

Dot placement detail 

Finished!

Isn't this so cute?! I just absolutely love how girly these polka dots make me feel. I also loved this color combination. Well, that's all for this week. Until next time :)

Thursday, October 30, 2014

Fish tail braid

Hey there!

This week's mani looks really intricate but is actually quite simple once you get the rhythm of the pattern down. You don't even need any fancy tools for this one, just nail polish. I will admit, it was time consuming doing this pattern on every nail. For a quicker version, you could do just your thumbs and ring fingers and keep the rest a solid color. Well, get's into it!

I began as always with a base coat of OPI Start to Finish Formaldehyde Free formula. I then followed with a coat of ORLY Buried Treasure. Once dry, I drew a diagonal line, starting at the right corner base of the nail and going left towards the other side of the nail, with ORLY Liquid Vinyl. Then once that black line was partly dry, I made another diagonal line starting at the opposite corner at the base of the nail and going right, making an x as I overlapped the black line I had previously done, in Sei Bella Violet Storm. I continued this pattern of overlapping in diagonal lines and alternating the three colors of polish until I reached the desired amount of lines and achieved the "braided" look. Once completely dry, I topped it with a fast drying top coat of INM Out the Door.


ORLY Buried Treasure

Diagonal line of ORLY Liquid Vinyl
Diagonal line of Sei Bella Violet Storm
Diagonal line of ORLY Buried Treasure

Diagonal line of ORLY Liquid Vinyl


Finished product


This was such a fun mani!! I loved the finished look. It looks so hard, but really it's not too bad. I think the hardest part is starting the first two diagonal lines. Once you do the first two, then you can decide how thick or thin the lines will be depending at what point you decide to do the next overlapping diagonal lines. I hope it makes sense with the pictures! It is somewhat forgiving too, because you will always be painting over at least part of what you already painted when you go in with the next color. So I guess just be careful to not put really thick layers of polish, since you have to use quite a bit before you get to the bottom of your nail. Please feel free to ask questions if you have any! Thanks for reading and I'll see you next week! 

Thursday, October 23, 2014

Black french tip

Hello again to all my nail art friends!

Today I am sharing with you a very simple manicure. I've noticed that when I go one week with a dark, bold manicure, I usually want to do something totally opposite the following week and that was true this week, as I decided to do a simple twist on the traditional french mani and do the tips black instead of white.

I started off with a base coat of OPI Start to Finish Formaldehyde Free formula. I then followed with two coats of OPI Passion. Once completely dry, I used nail tape as a guide for my french tips. Using ORLY Liquid Vinyl, I painted my tips and promptly removed the tape. I finished my mani as always with a fast drying top coat of INM Out the Door.

OPI Passion

Nail tape guide 

Paint above tape

Remove tape and voila! 


Finished Product


This mani is perfect for beginners who want something fast and easy or for those who don't like too much going on on their nails. Change up this look by choosing different colors as your base and tip. I've seen tons of variations of this mani, the possibilities are endless! See you next time! 

Thursday, October 16, 2014

Black and White Stripes

Hello, Hello!!

Today I am so pumped to share with you another great mani!  With it being mid October, I thought I would use black and white in the spirit of Halloween.

This manicure involved the use of nail striping tape. I purchased mine very cheap online through Amazon. You can find this tape in beauty stores, but they cost more. Anyway let's get into the process of how this look was accomplished!

First, I started with a base coat of OPI Start to Finish Formaldehyde Free Formula. I then followed with two coats of OPI Alpine Snow. Once completely dry, I applied the striping tape in a diagonal pattern and covered that with one coat of ORLY Liquid Vinyl. Then I carefully removed the tape and once it was completely dry to the touch, I sealed it with INM Out the Door Fast Drying Top Coat.

Striping tape over white base


Black over striping tape

Pull off tape and voila!


Here is the finished product:
 

You can play around a LOT with the striping tape and add variation to this look. You can change the thickness of the stripes by putting several pieces of tape side by side or change the direction of your stripes by changing the angle in which they face. I was going for a zebra look, but I think I can achieve that better with an actual striper nail polish instead of using tape. Another thing to be careful about is once your design is dry and it's time to apply top coat, to make sure you use a generous amount and not drag the nail polish brush because it can smudge it. Your brush should easily glide over nail because it's sitting on the actual polish and not your nail. 

I hope you enjoyed this mani! Feel free to ask questions or comment. See you next week! 

Thursday, October 9, 2014

Dot Accents


Hello!! I am VERY excited to share with you my very first manicure on this blog!

Before I begin, I want to let you all know that I am NOT a professional nail artist. I DO NOT claim any of these designs to be my own. Everything on this blog is my personal opinion.

For this look, I started with a base coat of OPI Start to Finish Formaldehyde Free formula. I followed with two coats of Sei Bella Crushed Berries. Using OPI Alpine Snow and a medium sized dotting tool, I placed four dots at the base of my nail to create this look. Once dry, I finished it off with a coat of INM Out the Door fast drying top coat.

I usually don't go for reds, but this berry color is beautiful, especially for Fall. I could have gotten away with one coat since it is so opaque, but I almost always do two coats for my base color. My placement of the dots wasn't spot on. Ha Ha. I think my pinky finger best represents what the design is supposed to look like. Overall, this was a very simple manicure, great for beginners.


Monday, September 22, 2014

Intro

Hello world!

I am Jess and I am a brand new nail polish/nail art blogger!

In the past year, I have taken up nail care and nail art as a hobby. I have come to love the time I have each week, when I give myself a manicure and try out a new nail art design.

This blog will be dedicated to my weekly manicure. Each week, I will post a photo and a description of how I achieved the manicure.

I am excited to start this journey! See you then!